
A step-by-step guide on completing the online immigration declaration form for Da Nang travel, including timing, required information, and helpful tips to ensure smooth entry.
Before you visit
- Korean address
- No verified information available.
- Getting there
- No verified information available.
- Opening hours
- No verified information available.
- Menu & prices
- No verified information available.
Introduction and Preparation
There are many things to prepare before a trip to Da Nang.
If you have already arranged your passport, airfare, and accommodation reservations,
please also prepare the online immigration declaration form before departure.
At first glance, the English interface and visa section can seem difficult,
but switching to Korean and filling it out step-by-step makes the process much easier to follow.
Today, I will organize the steps for filling out the Da Nang travel immigration declaration form while looking at the screen!
First, check these points ✓
• When to fill out: From 3 days (72 hours) before the flight departure
• What to prepare: Passport, flight number, accommodation address in English, contact number and email
• Final step: Save the QR code after submission!
You can also confirm the timing and QR code presentation procedure in Korean Air's Vietnam pre-arrival declaration guide. Please check the latest instructions from your airline right before traveling.
Accessing the Official Site and Initial Steps
01. Access the official website
First, please access the link below.
👉 Direct link to the Vietnamese online immigration declaration official site
The address is prearrival.immigration.gov.vn.
Since you will be entering passport information, please verify the official domain in the address bar before starting.
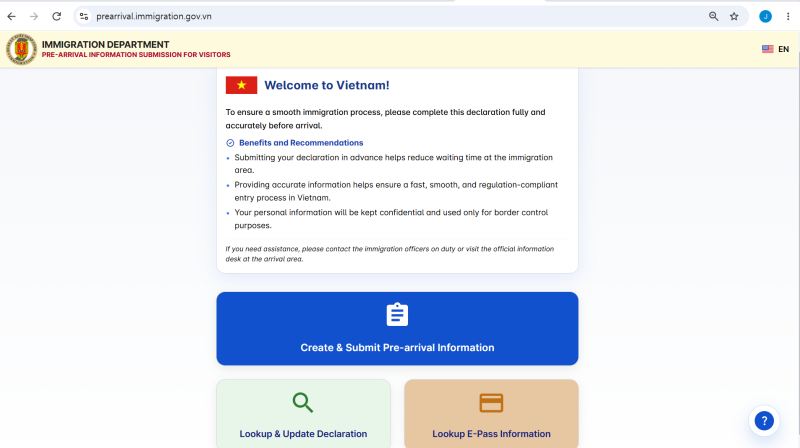
This is the first screen of the official site. Click 'EN' at the top right to select Korean language.
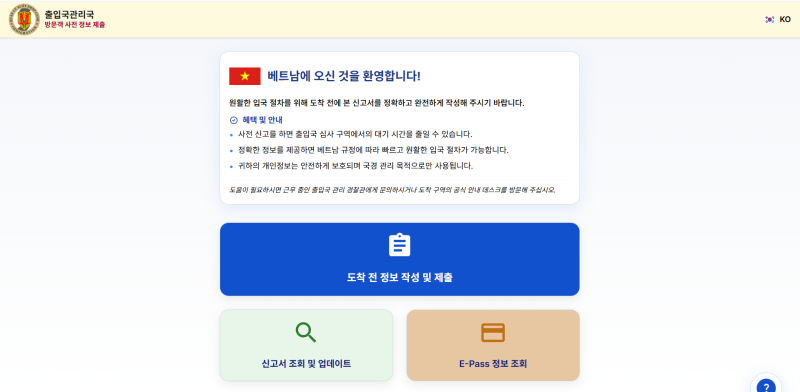
On the Korean screen, enter through the blue button labeled ‘도착 전 정보 작성 및 제출’ (Fill and submit information before arrival).
Entering Personal and Travel Information
02. Select nationality and prepare passport information
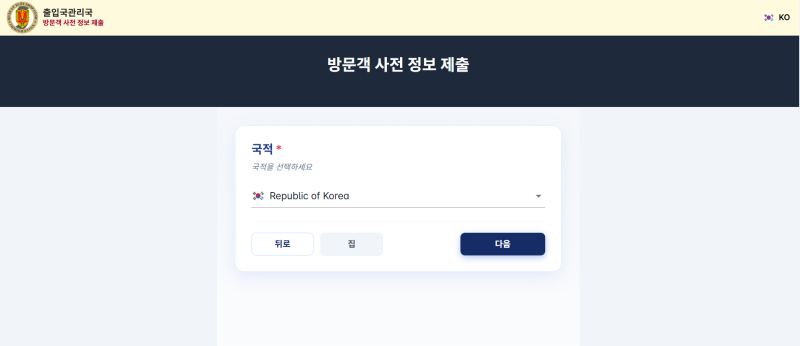
If you are traveling with a Republic of Korea passport, select
‘Republic of Korea’ for nationality and then press ‘Next’.
Each traveler must choose the nationality matching their own passport.
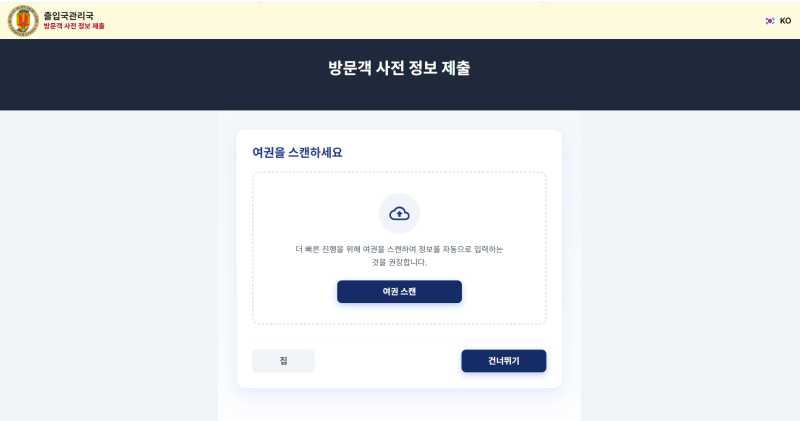
Next is the passport scan step.
You can load information by ‘passport scan’, or
press ‘skip’ to manually enter the details yourself.
Do not proceed immediately just because the information auto-filled!
The passport number or English name may be misread,
so it is better to compare letter by letter with your actual passport.
03. Enter passenger information
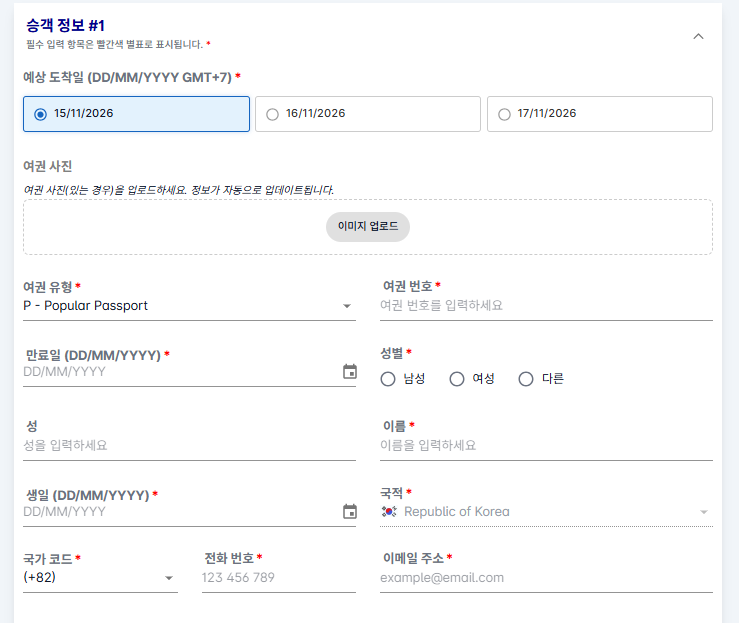
Now you can enter the information with your passport and flight ticket next to you.
Especially, double-check the following items before submitting.
• Expected arrival date: Choose the date you will arrive in Vietnam. Check the GMT+7 on the screen, and be careful if your flight crosses midnight.
• Passport type, number, expiration date: Enter exactly as shown on your passport.
• Surname and given names: Enter in English according to your passport's surname and given names.
• Date of birth: Make sure the format is day/month/year (DD/MM/YYYY).
• Contact number and email: Include country code and phone number, and enter an email that you can actually check.
📌 The dates shown in the pictures are examples on the screen.
Do not write them as is; fill in according to your own flight schedule and passport information.
Visa Information and Clarifications
04. Visa information and if 'Single Direction Exemption' is confusing
On the visa information screen, first read the instructions and check the confirmation box.
If entering with a visa, enter the visa information as issued.
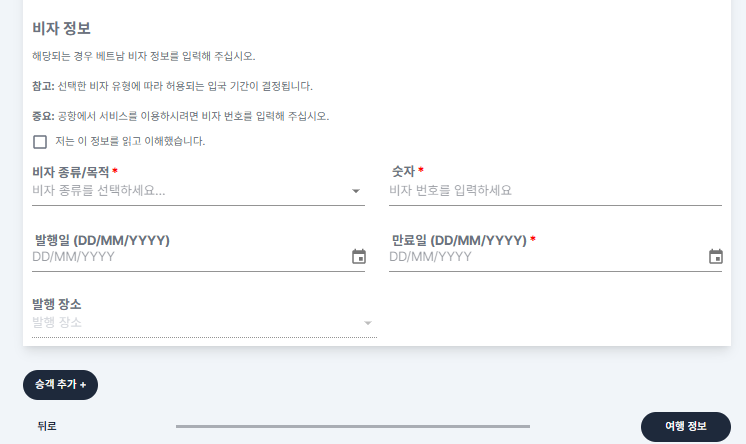
For Korean passport holders preparing for visa-free travel,
the term '단방향 면제' (single direction exemption) in the picture might be unfamiliar.
This term refers to a one-way visa exemption in translation,
not a one-way flight ticket.
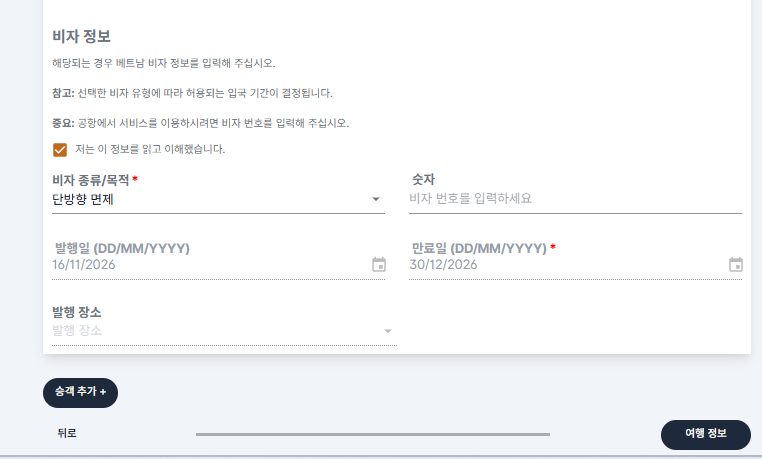
According to the Embassy of the Republic of Korea in Vietnam, Korean nationals who meet entry requirements can stay visa-free for up to 45 days from the date of entry, and the passport validity must be more than six months. This policy is valid until March 14, 2028.
👉 Check embassy visa-free stay information
However, if you have a visa or different stay conditions, your selection may change.
Check the issue and expiration dates on the screen instructions and the guidance displayed after selection. Do not simply copy the dates shown in the pictures, and do not enter a visa number if you do not have a visa. If the meaning of the dates is unclear, check official guidance before proceeding.
Flight, Accommodation Details, and Submission
05. Enter flight and travel information
Next is travel information.
For a sightseeing trip departing from Korea to Da Nang, select the departure place and travel purpose according to your plan, as shown in the screen below.
Choose the mode of transport ‘공기’ (air), which shows a plane icon indicating air travel.
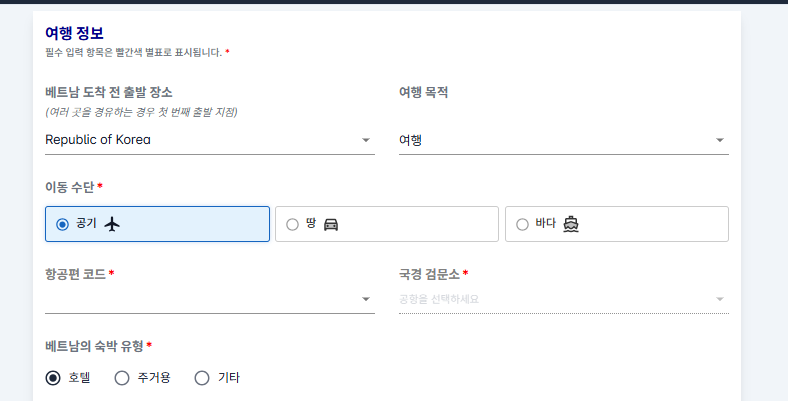
Check the actual flight number listed on your ticket for the flight code selection.
Be careful not to confuse with your reservation number on the ticket.
Border checkpoint refers to the airport where you will enter Vietnam.
If entering at Da Nang International Airport, select the corresponding ‘Da Nang International Airport (DAD)’ item from the list. If you clear immigration at a different airport first, select based on the actual immigration airport.
06. Confirm accommodation address and planned departure date
If staying in a hotel, select ‘hotel’ as the accommodation type,
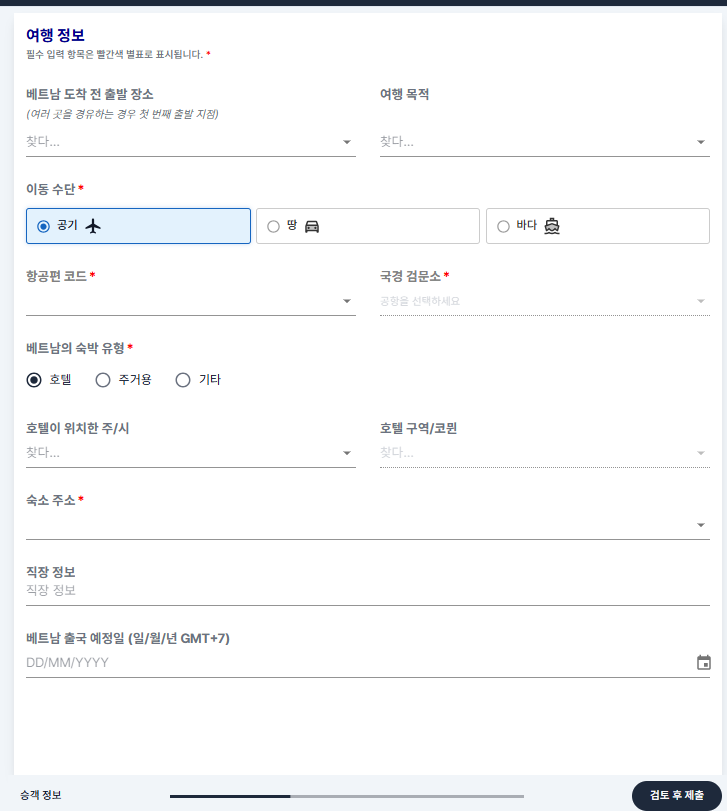
and prepare the English address of your lodging shown on your booking confirmation.
Enter the province/city, district, and address of the hotel
in the order requested on the screen.
Even if you are traveling to Da Nang, if your accommodation is in another area like Hoi An,
select based on the actual address of your lodging.
The planned departure date from Vietnam is the date you leave from Vietnam locally.
It may differ from your Korea arrival date, so check your return ticket carefully.
Fill out any other non-mandatory fields accurately according to the screen instructions.
07. Review, submit, and save the QR code
When you have finished entering, click ‘Review and submit’ at the bottom right.
Finally, confirm the following before submission.
✓ Is the English name and passport number accurate?
✓ Do the arrival and planned departure dates match your flight tickets?
✓ Is the flight number and entry airport correctly selected?
✓ Have you entered the accommodation address and email correctly?
✓ If filling out for companions, is every traveler's information accurate?
After submitting, save the issued QR code to your mobile phone.
Capture it so you can open it without internet,
and prepare a printed copy if needed for convenience.
Since Wi-Fi at Da Nang airport can be unstable, it is recommended to complete the form and save the QR code before arrival. Prepare to present it together with your passport at immigration.
👉 See the consulate's guide to pre-arrival declaration in Da Nang
※ The photos in this post cover up to the travel information entry step and do not include submission or QR code issuance screens.
Remember these before departing Da Nang ✓
Final Checks and Tips Before Departure
Prepare your passport, flight, and accommodation information in advance,
then proceed in order: access official site → enter information → review and submit → save QR code.
Though there seem to be many fields at first,
go through the steps carefully while referring to the screen.
Complete your entry preparation ahead and start your exciting Da Nang trip 🌿
This post was organized based on the screen dated November 15, 2026, and official institution and airline guidelines. The screen layout and guidelines may change, so please confirm the latest notices before departure. Submitting the pre-arrival declaration does not guarantee visa issuance or entry permission.
#DaNangTravel #DaNangImmigrationDeclaration #VietnamEntryForm #VietnamOnlineEntry #DaNangTripPrep #VietnamPAI #DaNangAirport
.
Bright Pick shares firsthand discoveries and practical information about Korea in Korean, English, Simplified Chinese, Japanese, Vietnamese, Uzbek, Russian, and Hindi. Stories draw on the original author’s experience, with AI-assisted translation and editing. Original sources are linked.
Read the original blog ↗


Join the conversation
Be the first to share your thoughts.